The Guide to SMC Inducement and Breaker Blocks in Forex

When high-impact geopolitical events like 50% US tariff announcements hit the market, institutional traders don’t panic buy or chase breakouts—they engineer liquidity. The SMC Inducement and Breaker Block strategy gives retail traders a precise roadmap to align with these institutional re-positioning moves on CAD/USD pairs. By identifying where retail stops accumulate (inducement) and where failed order blocks flip structural bias (breaker blocks), this setup captures aggressive expansion legs with minimal drawdown.
What Is SMC Inducement & Breaker Block Strategy?
The SMC Inducement and Breaker Block strategy is an institutional price-action methodology designed to trap retail traders during high-volatility shifts. A Breaker Block is an order block that failed to hold price and resulted in a market structure break, turning former supply into demand or former demand into supply. Inducement refers to minor swing highs or lows built intentionally by institutional liquidity providers to trick retail traders into entering early before sweeping their stop orders into the actual point of interest.
Why This Edge Works
Macro shocks such as tariff hikes trigger massive order flow imbalances. Retail traders react by jumping into breakout momentum or setting early limit orders at immediate support/resistance levels. Smart Money relies on deep liquidity pools to fill multi-million dollar positions without slippage. By driving price through a minor swing level (the inducement), institutional algorithms collect the stop losses of early sellers and trigger market buy orders from breakout traders. This injection of liquidity fills institutional short orders directly inside the Breaker Block zone, fueling the true directional drive.
The Setup Rules
To qualify a high-probability SMC Inducement and Breaker Block trade during volatile currency shocks, price must satisfy every condition in sequence:
- Higher Timeframe Context: Identify a clear directional bias on the 1-Hour or 4-Hour timeframe following news-driven expansion (e.g., strong USD strength / CAD weakness post-tariff release).
- Market Structure Break (BOS): Price must aggressively displace through a key swing high or low, leaving behind a failed order block that converts into a Breaker Block.
- Breaker Block Identification: Highlight the last down-close candle before a bullish structural break (for a bullish breaker) or the last up-close candle before a bearish structural break (for a bearish breaker).
- Inducement Formation: Look for a minor internal swing low or high forming in front of the Breaker Block. This minor structure must act as structural bait for early traders.
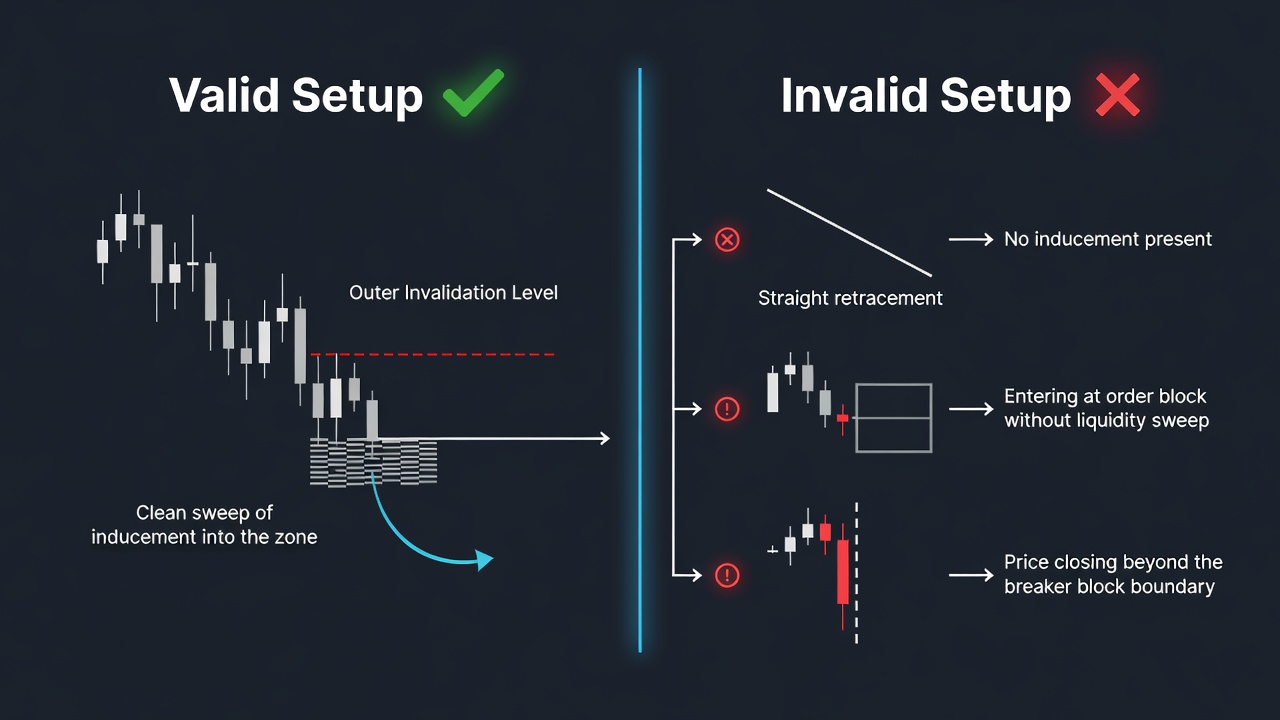
- Liquidity Sweep: Price must wick past or aggressively clear the inducement level to trigger stops into the Breaker Block zone without closing beyond the Breaker Block invalidation point.
Free For Traders
Know The EXACT Moment A Stock Hits Support Or Resistance
Real-time alerts fire the instant a stock approaches a critical level. Completely free.

Entry Trigger
Your entry executes the instant price sweeps the inducement level and touches the mitigation zone within the Breaker Block on a lower timeframe (1M to 5M). For conservative execution, wait for a lower-timeframe Change of Character (CHOCH) body close inside the Breaker Block before placing a limit order at the 50% equilibrium level of the block.
Stop Loss & Profit Target
Place your stop loss exactly 2 to 5 pips beyond the invalidation wick of the Breaker Block to protect against aggressive volatility wicks. Set your primary Take Profit (TP1) at the nearest internal liquidity pool (the origin of the inducement wave), securing a minimum 2R return. Set your secondary target (TP2) at the HTF major sell-side or buy-side liquidity target, typically delivering between 3.5R to 5R on macro-catalyst moves.
Trade Walkthrough: What It Looks Like on a Chart
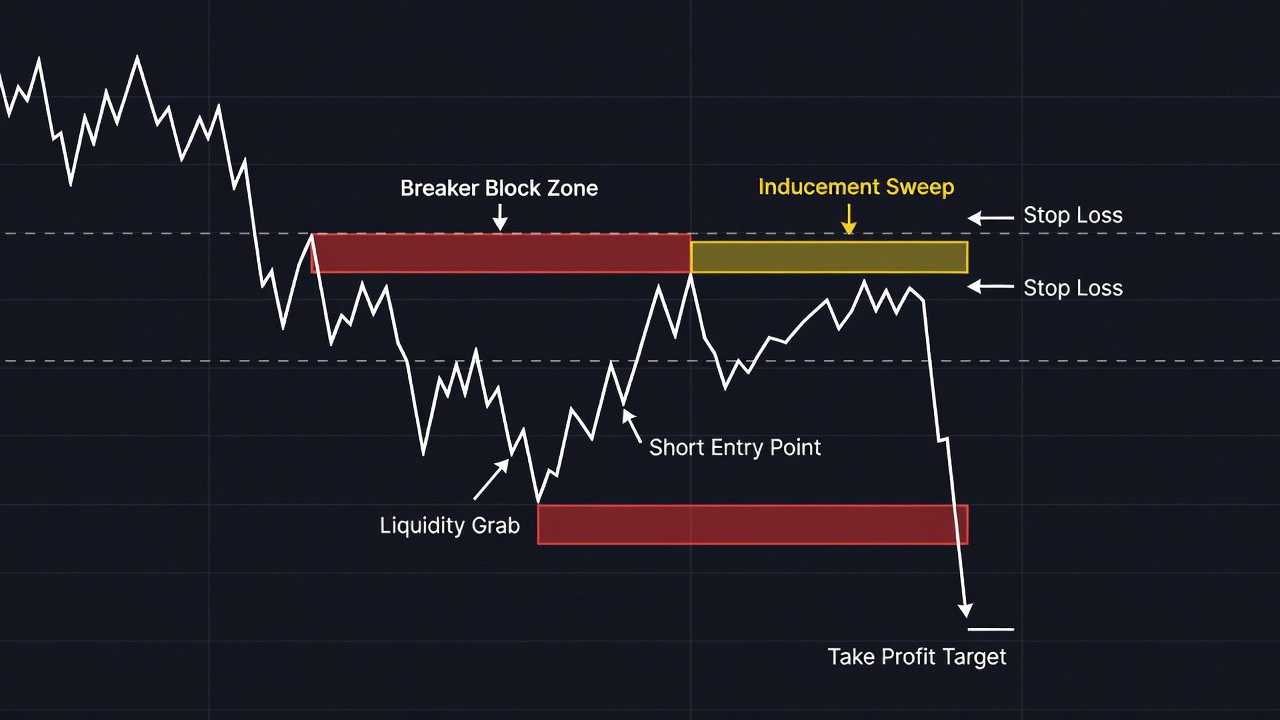
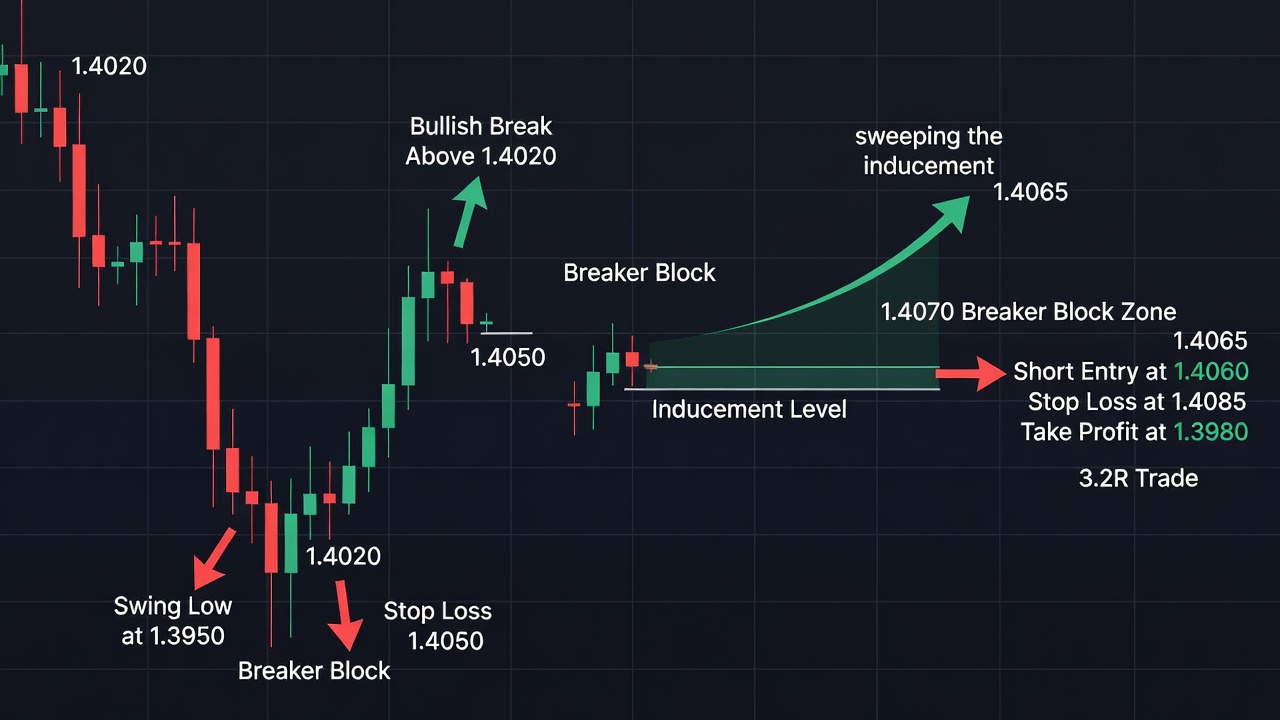
As you can see in the chart above, following tariff escalation news, USD/CAD experienced an aggressive downward displacement on the 15-minute chart, slamming through prior support at 1.3950. This displacement converted the prior bullish order block at 1.4070 into a clear Bearish Breaker Block.
Instead of crashing straight down, price pulled back and formed a minor swing high at 1.4050 before dropping again. This internal peak acted as explicit inducement—drawing in early breakout sellers while giving liquidity algorithms a target to sweep. Smart money then pushed price sharply up through 1.4050, purging retail short stops directly into the 1.4070 Breaker Block.
Our entry triggered at 1.4060 upon liquidity sweep into the Breaker Block. Stop loss was set strictly at 1.4085 above the Breaker Block body, risking 25 pips. Target 1 was swept at the internal liquidity low of 1.3980, yielding a clean 3.2R payoff as aggressive institutional selling resumed.
Common Mistakes to Avoid
- Entering Without Inducement: Trading a Breaker Block directly when price retraces smoothly without sweeping internal liquidity leads to high stop-out rates because price will often push deeper to hunt liquidity elsewhere.
- Ignoring Market Structure Context: Taking Breaker Block trades counter to the prevailing higher timeframe displacement post-news catalyst reduces setup accuracy significantly.
- Placing Stops Too Tight Inside the Block: Setting stop losses directly on the Breaker Block’s 50% line rather than past the outer invalidation boundary leaves trades vulnerable to institutional spread expansion.
- Misidentifying Order Blocks: Confusing standard consolidation ranges with true structural order blocks that caused displacement and market structure breaks.
From Find Better Trades
The First 60 Minutes Pay The Best. Be There.
Rapid-fire day trading setups for the opening hour — when institutional volume is at its absolute peak.

Quick Reference Checklist
- Is the higher timeframe market structure clearly aligned with the trade direction following the macro event? (Yes/No)
- Did price generate strong structural displacement that converted a former Order Block into a Breaker Block? (Yes/No)
- Is there an obvious minor swing high/low (inducement) sitting between current price and the Breaker Block? (Yes/No)
- Has price swept through the inducement liquidity pool directly into the Breaker Block? (Yes/No)
- Is your stop loss positioned safely beyond the Breaker Block boundary while offering at least a 1:3 Risk-to-Reward ratio? (Yes/No)
📈 Want More? Join Our Free Trading Community
- Trading Strategy Guides Telegram — daily strategy tips and market insights
- Find Better Trades Telegram — free trade signals delivered to your phone
- Find Better Trades on YouTube — live trade breakdowns and tutorials