Profitable Renko Strategy – Building your Account, One Brick at a Time

Profitable Renko Strategy – Building your Account, One Brick at a Time
The Profitable Renko Strategy is designed to remove a lot of the market noise generated by the standard candlestick charts. If you’re tired of using the same old Japanese candlestick charts, we like to introduce you to the Renko charts. By employing Renko charts we remove the time element and only focus on the price isolating the trend.
If this is your first time on our website, our team at Trading Strategy Guides welcomes you. Make sure you hit the subscribe button, so you get your Free Trading Strategy every week directly into your email box.
When you’re actively trading the markets (scalping, day trading) it’s important to have a methodology to clear out the market noise. The Renko trading strategy is time-independent and gives you an eccentric way to view price action.
Even though the free Renko charts can be used across different asset classes, including cryptocurrencies our simple Renko system is designed, but not limited, to be used in the Forex market.
In this trading tutorial, we’re going to teach you what Renko charts forex are, how to use Renko charts live in your trading, and how to optimize the Renko brick size.
What are Renko Charts?
A Renko chart is a technical tool or a type of chart that is built by only using price data. Unlike the Japanese candlestick charts, which are built using price, time and volume, the Renko chart only measures price movement.
Renko has no time dimension.
See below, how a typical forex Renko chart looks like:
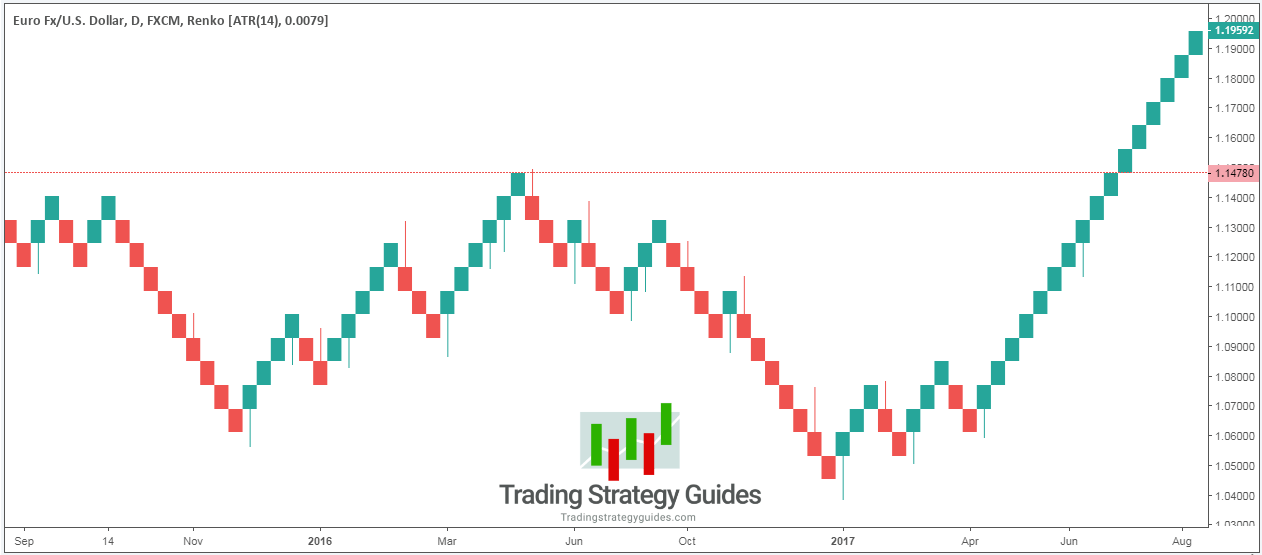
Renko charts are not some long-hidden secrets dating back to feudal Japanese times as some trading gurus would like you to believe. Renko bars were actually developed several decades ago.
The name Renko means brick in Japanese and comes from the word “renga.” These charts are sometimes referred to as brick charts by traders.
Steve Nison who is the father of modern candlestick charting is the man who actually made Renko charts forex known to the general public. These charts are often compared to traditional candlesticks but have some key differences. While candlestick charts have varying lengths of “wicks” throughout, Renko bricks are all the same size.
The simplified bricks found in Renko charts make it easier to read the market and make quick decisions. These charts are ideal for day traders, though they can be used by traders using any timeframe. By removing the noisier parts of the candlestick chart that apply to longer-term trading strategies, Renko charts make it possible to determine where the market is actually moving.
See below the difference between the popular Japanese candlestick chart and Renko chart live:
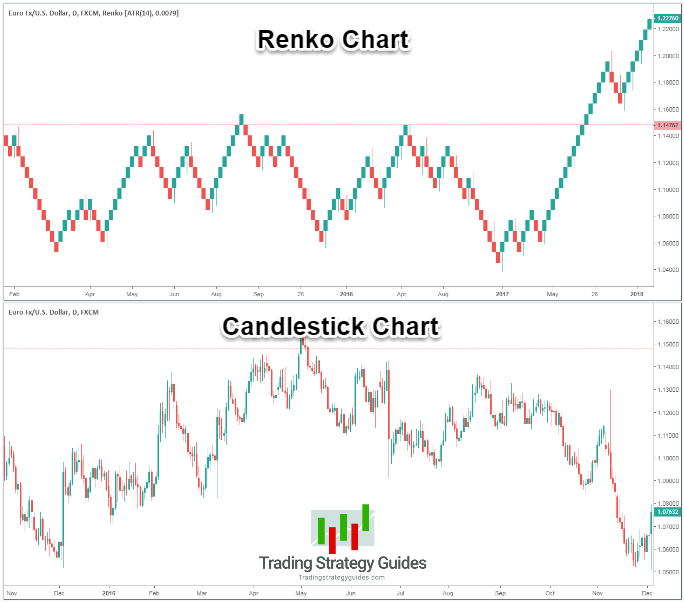
The difference between the two types of charts is quite visible. The Renko chart does a much better job to smooth the price action.
Let’s go one step forward and learn how Renko bricks are formed.
In order to use a profitable Renko strategy, you really need to understand the basic foundation of a Renko block
Every candlestick on the Renko chart is called a brick because it has the shape of a building brick. The rectangular bricks used for building walls are about the same size. The same goes with Renko charts; every brick is the same size. The size of a Renko brick is pre-determined by the user.
How to Read and Build a Renko Trading Chart
Reading a Renko chart is simple. Because the bricks have a fixed size, they can all easily be compared to one another. The color (and direction) of the Renko brick will change once the value of the previous brick has been exceeded. This indicates to traders that trends are changing and that the price is likely to swing in the opposite direction.
Each brick represents a price range (example – $0.25). However, while the bricks are evenly sized within the same graph, they can be adjusted to your trading objectives. Individuals opening and holding longer, high-cap positions will use different brick sizes than penny stock day traders.
We recommend using the average true range—or, ATR for short—in order to construct each brick. The ATR is derived from the closing price of the stock. This means that a Renko chart is a lagging indicator. In the next step, we will show you how to read Renko bars.
Note #1: if you use Renko bars with wicks or tails, then some bricks may display additional wicks either at the top or the bottom of a brick. But the brick size remains the same.
On the Tradingview charting platform you can go to Chart Settings – Style – Wick, and select which way you want the bricks to be displayed, with or without wicks.
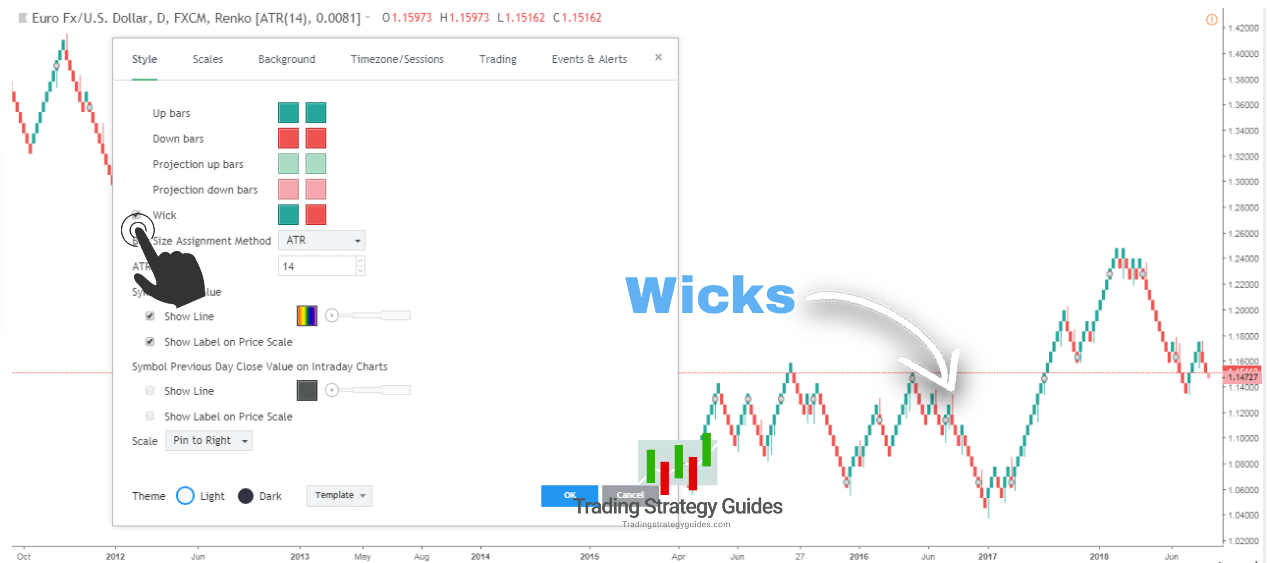
Before returning to the Renko bricks with wicks, let’s give you the basics or the foundation of a Renko brick.
See below:
How to Trade with Renko Charts
We already established that the brick size is pre-determined by the user. If you’re trading with Renko charts, and your preferred brick size is 20 pips, then bricks only form when the price moved either up or down by 20 pips.
The best way to illustrate this concept is to look at Renko blocks through the eyes of the candlestick charts. In the EUR/USD 5-minute candlestick chart below, we highlighted areas of 20 pips worth of price movement.
A green Renko brick would form only after the price will advance 20 pips. Conversely, a red Renko brick would form only after the price declines 20 pips.
As you can tell, the time intervals between each brick are inconsistent.
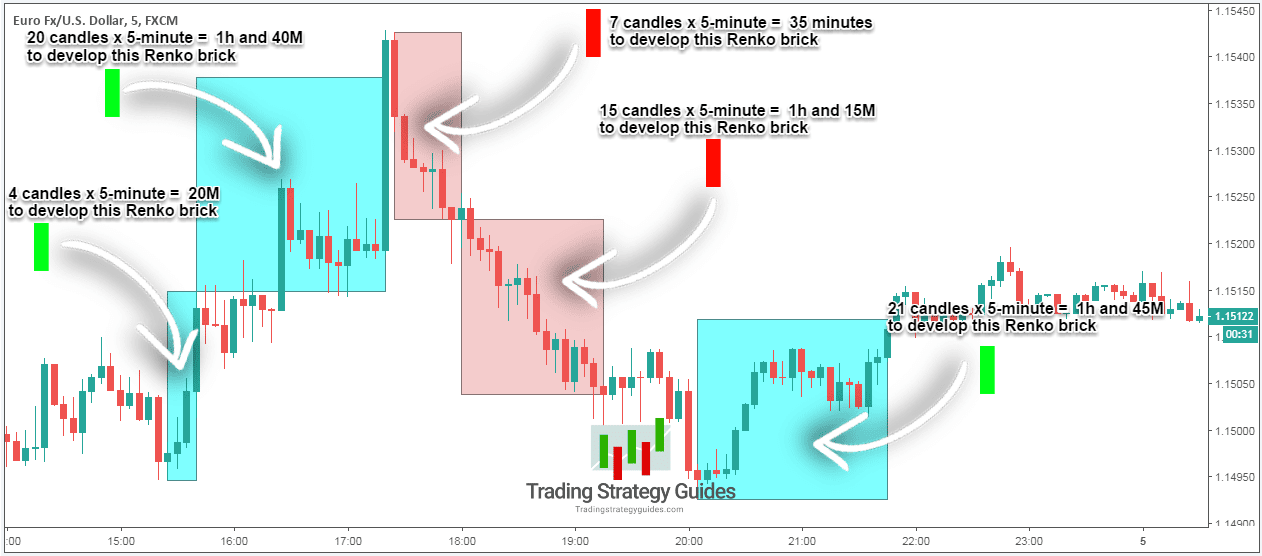
In our EUR/USD chart example, the length of the time it takes to print one Renko block varies from 20 minutes up to 1 hour and 45 minutes.
It’s clear that Renko is less noisy and cuts through a lot of the noise between the swing low and swing highs.
Important note: When you trade with Renko charts, the price needs to travel double the price distance of your brick size in order for the Renko brick to change color.
For example, if the brick size remains 20, it means that we need to actually move 40 pips for a red brick to be printed after we had a green brick.
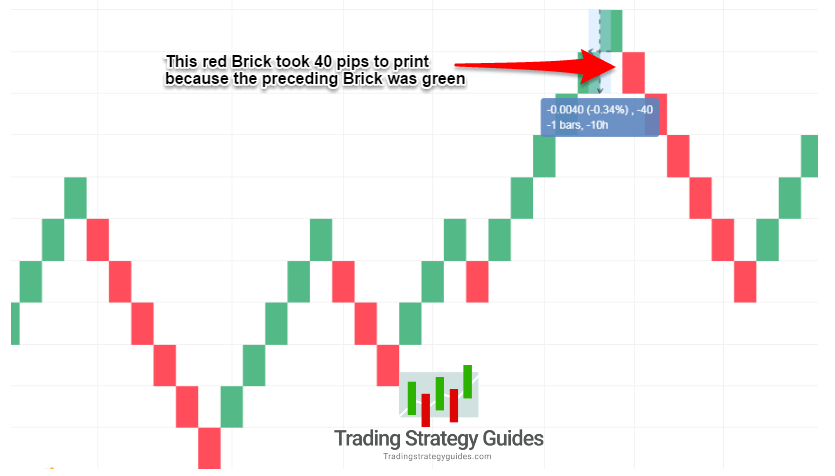
Let’s return for a second to why some blocks have wicks?
Trading Renko charts with wicks can be a very powerful tool in your trading arsenal. Bricks with wicks give us further clues on the battle between the bulls and the bears.
A wick is printed on a Renko brick only when there is a strong attempt to produce a reversal (a change of brick’s color from green to red and vice versa), but it fails. The wick will simply show you how many pips it went in the opposite direction.
Note #3: a wick is printed on a brick only when the price moves in the opposite direction of the previous candle by at least the length of the brick size +1.
Let’s see how you can optimize the Renko block, and how to choose the right Renko brick size.
How to choose the right Renko Brick Size?
If you don’t know what the right size for Renko charts is then, we have a solution.
If we want a dynamic reading of the price through the Renko blocks, we can use a brick size that is determined by the ATR (Average True Range). Instead of picking a random brick size, this will give you dynamic support and resistance levels that are more accurate.
The ATR will automatically detect the right brick size that is more in tune with the price action.
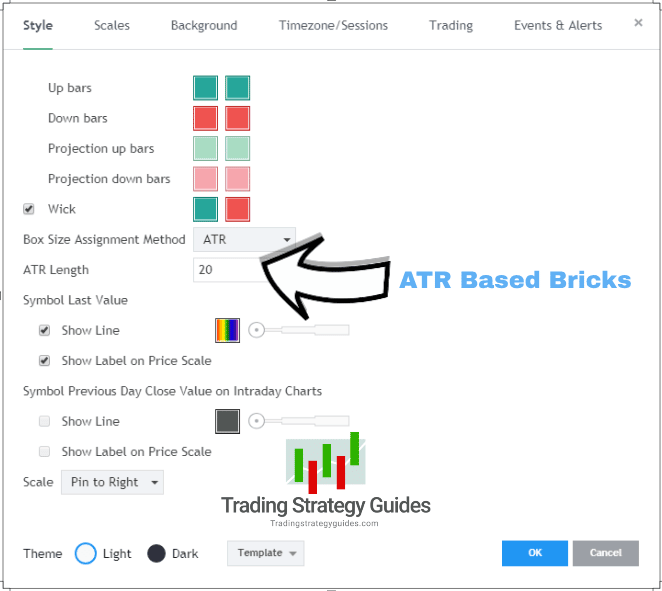
Note #4: The disadvantage of using an ATR based Renko chart size is that when the ATR value changes, your Renko bricks are redrawn again to reflect the new changes.
When selecting your Renko brick size, ask yourself the following questions:
- What are my objectives as a trader?
- What are my time constraints? What is the cost of trading?
- Am I opening small positions or larger positions?
- Do I consider myself risk-tolerant or risk-averse?
If you are pursuing large, lower-risk positions over longer periods of time, then it will make sense to use a larger Renko brick size. On the other hand, if you are pursuing high-risk positions that require paying close attention to volatility, then smaller bricks will be better.
Next…
Learn how to trade Renko charts successfully by following simple 4 trading rules.
See below:
How to trade Renko charts successfully
When used the right way, Renko charts can be extremely helpful.
To kick things off, here are 4 trading rules to use and make any Renko trading system more accurate:
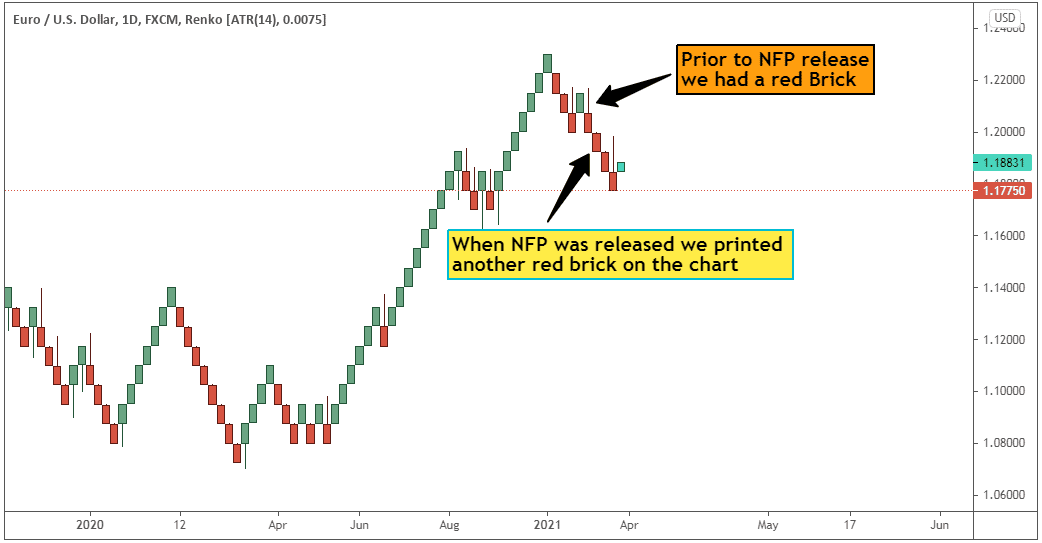
- If the prior Renko brick is green (red) ahead of a major risk event, the probability that the price goes up (down) is extremely high.
- Double top and double bottoms have a higher probability of success then compared to the candlestick chart
- To confirm a breakout use the 2 bricks rule. If two consecutive bricks close above/below a key support and resistance level, the breakout will extend
- Trading divergence on the Renko chart is extremely helpful to find reversal patterns
See the Renko chart below.
We decided to put the theory to the test with a little trade example.
Next…
Let’s see how profitable Renko chart trading really is.
See below:
Is Renko trading profitable
If you still struggle with the standard candlesticks chart, we believe Renko trading can be more profitable for you. With Renko charts, you have a much clearer view of the price action.
But, how profitable are Renko charts?
In order to discover how profitable is Renko trading, we backtested one of the best Renko trading systems out there.

The result is quite a smooth equity curve that even the most successful trader envy.
Next…
Let’s learn how to trade the Renko chart the right way.
See below:
Simple Renko System
We’re going to propose two trading strategies that you can use with the Renko blocks. The first simple Renko system is an indicator based strategy that uses price-momentum divergence to identify trend reversals.
How to Use Renko Chart for Intraday Trading
For this Renko trading strategy, we only need to use the RSI indicator. We like to use a 20-period RSI indicator. So, the period is the same as the ATR Renko brick size.
See the Renko chart scalping below:
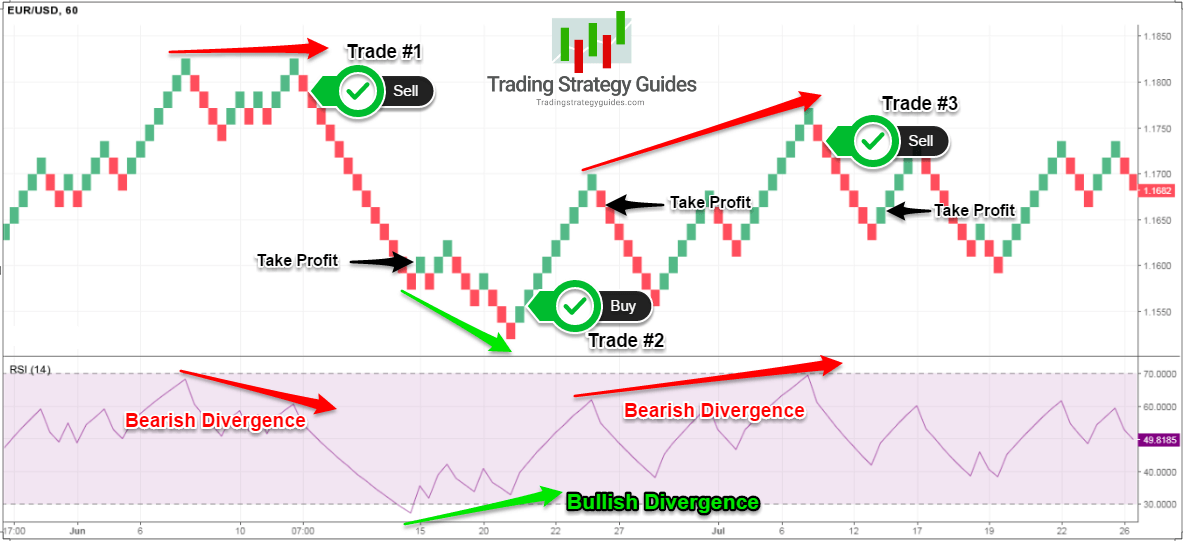
After we spot the momentum divergence an entry signal is triggered once we get a reversal. On the Renko chart, a trend reversal is set in motion once the brick changes color. In this case, when we spot a bearish divergence, enter a short position after the brick turns red.
For bullish divergence, wait for the brick to turn green.
We exit our profitable trade once another reversal pattern is formed in the opposite direction of our trade. As a method to protect our account balance and not lose too much, you can place your SL above and below the swing point developed after your entry.
A lot of the noise inherent in regular time-based charts are eradicated. So, if you trade with Renko charts, spotting divergence and trend reversals are a lot easier. The RSI is the best indicator to use with Renko.
Renko Trading Strategy #2
Another profitable Renko strategy you can use is to focus only on the bricks.
No additional technical tool is required for this system.
We’re going to explore a very simple and yet very powerful Renko chart pattern that incorporates the wicks. This Renko price pattern looks for two consecutive bricks of the same color and both bricks have wicks.
The location of this Renko pattern doesn’t matter. It can be at the end or middle of a trend. This pattern has a very high rate of success if traded in the right context. You have to look around these two brick patterns and make sure the blocks are not moving back and forth within a trading range.
If that’s not the case, then you have a green light to take the signal generated by this trade setup.
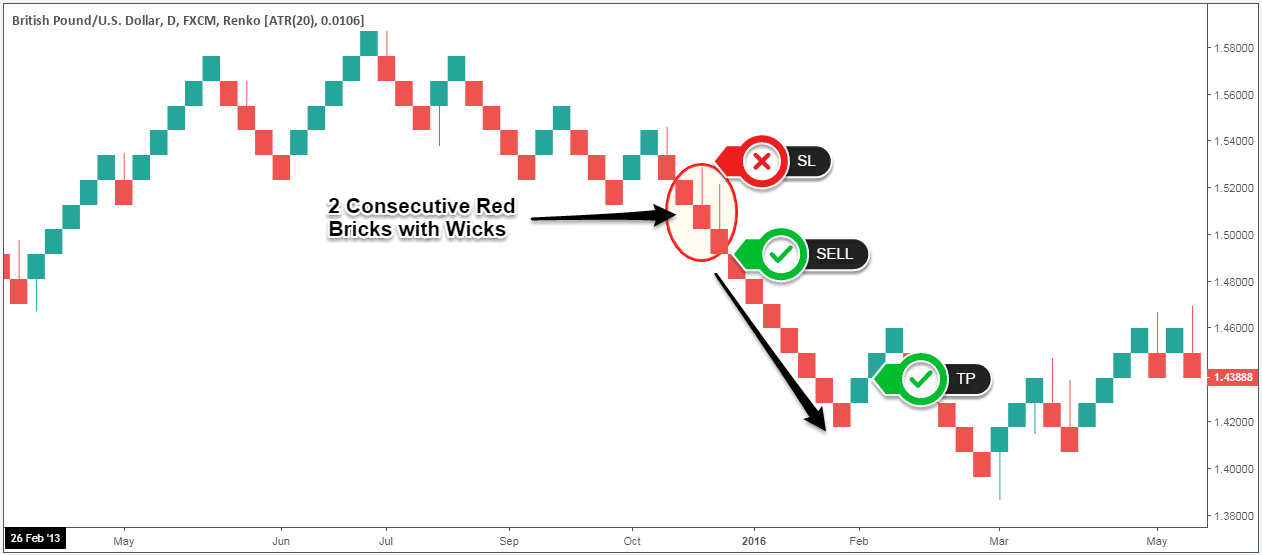
The entry is on the third brick after the two bricks that have wicks. The stop loss can be placed above the wicks and exit once a reversal pattern is produced.
Profitable Renko Strategy Video
Final Thoughts – Profitable Renko Strategy
Renko bars ensure that you have a cleaner and neater representation of price action. If you’re having a hard time reading the price on a candlestick chart, maybe it’s time to look in another direction. Trading with our profitable Renko strategy can be the perfect fit for you.
We truly believe that Forex Renko charts are more suitable for traders who still struggle to analyze a candlestick chart. The profitable Renko strategy presented throughout this trading guide is just an introduction to the world of Renko bricks. We hope you now have a clear idea of what the possibilities are by using this new charting technique. Don’t forget to read our Chart Pattern Trading Strategy.
Thank you for reading!
Feel free to leave any comments below, we do read them all and will respond.
Profitable Renko Trading Strategy Infographic PDF Download
Please Share this Profitable Renko Trading Strategy Below and keep it for your own personal use! Thanks, Traders!





Hi, unfortunately I could not find and download the Ranko chart. please help. And explain how to set it to MetaTrader. thank you very much
You don’t download Renko (not Ranko). It’s shown using TradingView and MetaTrader doesn’t support it.
Renko strategy. In your graphic you show trade 3 as bearish with higher highs. Trade 1 is also bearish with lower highs.confused…..Pablo Blanco
Trade 1 is a double top strategy. High probability of a selloff. (Bearish) Trade 3 Is a pull back from exhaustion strategy. (Bearish) If your using candles or renko, both trades playout the same.
great input Chip! Thanks
Great …simply great.very well explained in simple language
I am very much impressed to read this article .lot of basic knowledge I got